December 7, 2022

Winter Scene


Hello! Since it's December and winter is here, I'd like to show you a little painting that reflects the current season. Because I am still very much learning to work with watercolor, I decided to follow a tutorial of a much more experienced artist - Karen Rice. The one I chose is called "An Essential Lesson in Watercolour", and can be accessed on You Tube here. I must say that Karen's instructions were very clear and easy to follow, and I had lots of fun painting along with her. Using watercolors is a little bit like herding water, so everyone's version will look different. Add to that one's choice of paint (Qor), paper ( Canson Montval), a tendency to tweak, and the results can vary dramatically from the original. 😄 Unlike Karen, I decided to skip adding human figures to my painting. Since I had to work rather quickly (before everything dried to a crisp), I did not take any 'in progress' photos. I know that my results are far from perfect, but I still have a certain fondness for the finished picture.
     Wishing everyone a wonderful and creative day, and a peaceful Holiday Season.


October 13, 2022

Red Apple in Oil Pastels


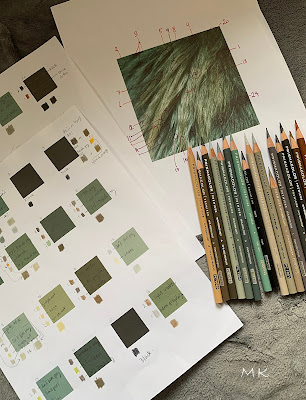
Recently, I got myself some oil pastels, mainly to try to find a medium that would be easy and quick to use for backgrounds in coloured pencil paintings. I also wanted something that will work nicely in paintings done exclusively in oil pastels. I remember using them years ago, in high school, and rather liking them. So, after some initial research, I settled on a small 12-pack of Sennelier oil pastels and Caran d'Ache Neopastels. To try them out, I decided to draw a red apple, using GreArt's How to draw apple with oil pastel tutorial on YouTube. This way, the topic and all the planning is already done for you. While the main components of my picture are very similar to those in the tutorial, I decided to completely change the leaf (to more closely resemble an actual apple tree leaf), and skipped the water droplets. I have nothing against water droplets or drawing them (they can look great and add a wonderful visual interest), but I see so many water droplets being drawn on nearly every apple and fruit these days, that I just simply don't want to look at them for now (much less draw them).


     Anyway... I found both brands of oil pastels wonderful to work with, at least on Strathmore Bristol Vellum, 300 series, paper. The Sennelier are famous for their creaminess and that they were, being best used as a last layer and for glazing. The Neopastels are a bit harder/waxier, but oh, so velvety in finish! Unfortunately, I was unable to fully capture the gorgeous, deep, rich finish of the pastels in photographs. No matter what light, positioning and camera I used, the lens could not capture the many details and nuances of the painting.
     Also, FYI, I used Canvy app to present my painting as if it was mounted on a wall, which appears to be much larger in scale than it actually is. In reality, the measurements of the image are only 12x16.5 cm/ 4.75x 6.5".
 
     Below are some of the steps of my drawing process.
 
     First, I roughly laid down the main color areas of the apple. I blended the colours in a vertical direction, but not very smoothly, in order to reflect the splotchy nature of apple skin. From then on, I added the stem and continued to add details, like more splotches, shading/highlights.

 
When I was more or less satisfied with the general look of the fruit, I added the leaf. I looked at a variety of apple leaf photo references, in order to see their general character. The leaf in GreArt's tutorial looked a bit too much like a hoya plant leaf for my liking.
 

After the apple was done, it was time to add the background. I decided to layer blue on top of black for added richness and depth. The process was so fast! If I used coloured pencils, it would have taken me many long hours just to build up that kind of smooth, dark, rich background. Here, it took me less than one hour for the dark navy background! I love how easily the Neopastels blended and layered! 

 
And this is what it looked like with all of the main components in place and blended. From this point on, it was just a matter of dealing with details and making adjustments. I  cleaned up the edges of the stem and leaves with  black and/or very dark  navy Prismacolor pencils. I also used a couple of coloured pencils to add some detail to leaf veins and small speckles on the apple.


And here it is finished, along with some photos of the details.


August 12, 2022

A Girl in a Hoodie


Hello! A couple of months ago, I finished a portrait of a young lady in a hoodie. I decided to paint her, because I found something slightly mysterious, gentle, peaceful and Reneissance-ish in the way she looked. As usual, for those of you, who like to have a glimpse into the creative process, I will show you some of the stages of my work. FYI, the portrait is painted with acrylics, using mainly the Golden (fluid) and Liquitex brands.
 
First, after sketching the positioning of facial features and hair, I established the main value areas mostly in gray tones, except for the face, which I wanted to keep vibrant throughout the process.


After the main value areas were established, I laid down the underpainting. The colour choices depend whether I want to amplify warm or cool qualities of the areas, or to boost the richness, depth or vibrancy of what will be painted on top. I must say, that at this stage, the painting looked rather scary.


In the next step, I roughly established the coloured areas. 


From then on, it was basically a matter of adding and refining details, adjusting the values, which can take up to several weeks, depending on how much detail you want to include and how much time you have.


And so on, until she's finished:


And that's about it. Thank you so much for visiting my blog. Don't forget to do something creative at least once a week - it's' very therapeutic. Wishing everyone a great day.


July 5, 2022

Grass Field - drawing exercise


Hello! Today, I present a little exercise I did to practice drawing a field of grasses/small landscape. It was rather pleasant and easy to do, and it did not take much time at all. For this, I used instructions in Denise Howard's 101 Textures In Colored Pencil. I worked with a mix of suggested Prismacolor Premier pencils and those that were somewhat close to the suggested ones, all on a hot pressed watercolour paper. Below is the process in a nutshell.

 This is what it looks like in the book:

 
And here are my steps (please excuse the fibers under the tape - I make it a bit less tacky by sticking it first to my clothing a couple of times, so that it won't lift off the top layer of paper on removal). First, I just laid down the basic shapes and main colours.

 
Next, I just deepened what I already had and started to add detail.

 
Here you can better see some of the colours incorporated into the drawing:


And here is the final result. I decided to add a bit of dark pink, to suggest some tiny flowers and to break up the green a bit. The whole picture is only about 3.5 x 3.5" in size.

 
Thank you very much for visiting. Have a wonderful day.


June 22, 2022

Watercolour pear

Hello! Today, I present a painting of a pear I made some time ago. I always wanted to become better at using watercolours, but found this medium to be too hard to control and unpredictable overall, especially comparing to acrylics. At first, I just tried to get a better understanding of the basics, so I enrolled in a short, yet very effective online course from Michele Webber - "Basic Watercolor Techniques." Afterwards, feeling like I could probably tackle something more complicated, yet not feeling confident in terms of painting something completely original, I decided to try one of Anna Mason's tutorials - The Pear, as I like botanical subject matter and how her paintings turn out. The fact that this tutorial was free and the painting itself did not seem too complicated was an added bonus. 

Although Anna provided a comprehensive list of needed materials and paint colours, I just used what I already had available, i.e. my own brushes, Arches Hot Pressed Watercolor paper and Roman Szmal paints.

Because I painted this a while back, and I treated it as a practice painting, I only took one 'in progress' photo of the pear:

 And here is the finished painting:


Overall, it definitely wasn't too hard, yet challenging enough for a watercolour beginner to get a satisfying learning and fun experience. 

Wishing everyone a nice day. See you in the next post.

April 16, 2022

Portrait of a young boy

Hello! Today I show a portrait of a young lad that I painted last year. Although I used a variety of acrylic paints, I mainly relied on Liquitex Basics and Golden Fluid. Although it's not very large, it took several months to complete, as I took breaks in between stages. 

Here is how I built the painting in a nutshell.
After staining the pre-stretched canvas with a diluted sienna, and transferring the main outlines onto the surface, I established the main values using Paynes Gray. Then, I lightly underpainted with orange for under skin and clothing, blue in the background, and violet for under the hair. Afterwards, I began building up the actual colors, starting with the face.


Here are the main colours laid out. From this point on, it's mainly fine tuning the shapes and adding in details.


And here it is about 75% done. At this stage, what's left are adjustments of shapes, colours, values and more glazing.

And that is that. Thank you so much for visiting. Wishing everyone a great day.

March 11, 2022

Drawing Cat Hair Exercise

Hello! Continuing with drawing exercises here - they're great for getting your drawing/painting fix when you don't have time, inspiration or energy for doing a bigger piece. This time, I wanted to practice drawing fur. Since I live with a cat, I decided to photograph a section of his coat and draw that. For this exercise, I used Prismacolor Premier pencils, on a hot press watercolor paper. The whole picture is approximately a 3.5" square. 

Following are the stages of my work, so that you can see how the whole process developed.

First, I swatched the color combos for the main areas of the photo.The swatches didn't print very accurately, but I was comparing the swatches with the photo itself . Because this was a small project, I just used the photo on my phone for reference. Otherwise, I would most likely do a good quality printout on some type of photo paper.

These are the pencils I ended up using. The French and Warm Greys were the most heavily utilized ones.

Drawing stage 1 and 2 below - after I roughly sketched the main clumps of hair, I began establishing some of my largest blacks, which also helped me orient the rest of the details throughout the project. In stage two, I laid down some white (you can somewhat see the shiny parts in the bottom right hand corner) as an underlayer, where I was planning to scratch off upper layers of pigment later for fine, stray hairs.

Stage 3 and 4. Layering continued. Basically establishing underlayer color areas and main shapes of fur clumps, while slowly introducing more details.

Meanwhile, the model himself (named Ozzie) decided to visit and check out the progress.

Stage 5 and 6. Continuing to add more layers and details.

And here is the finished piece compared to the actual photo. The little stray hairs and highlights were achieved with Tombow Mono Zero eraser and exacto knife. I think that I, more or less, got the gist of Ozzie's fur. The actual drawing is a bit more saturated, richer and the blacks are darker.

As a side note... Recently, I got myself a cheap, wooden cutlery drawer organizer at a dollar store. I use it to keep/organize my tools during a project, and I find it very practical. Before, I just used a small, flat  tray, but now I can separate the pencils into colour groups, keep erasers and such in their own compartment, but still carry it all in one "box".

Thank you so much for visiting today. Wishing everyone a great and safe day.